3 Minute Setup Guide for Mac
Your Anki Remote will be an important part of your medical journey. Let's optimize it for productivity, together.
Prerequisite
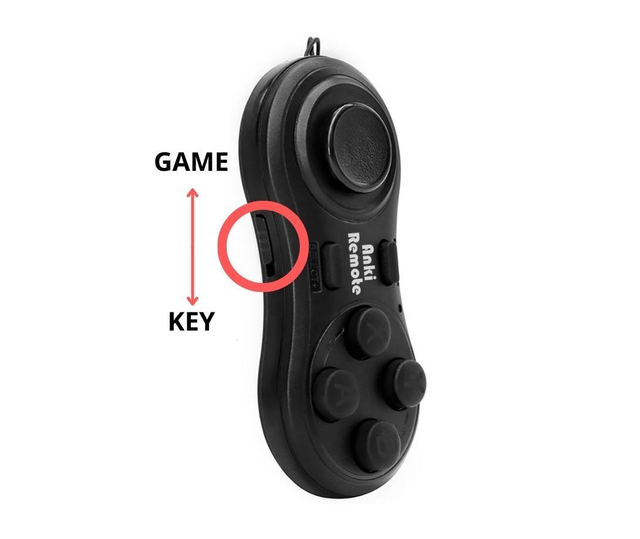
Are you in the right mode?
The remote will not function properly if you are in the GAME mode instead of the KEY mode.
How can I check the mode?
Refer to the image to identify the mode bar.
- If the mode bar is upwards, then it is in the GAME mode. This is the incorrect mode.
- If the mode bar is downwards, then it is in the KEY mode. This is the correct mode.
1. Connect Your Remote to Bluetooth
- Power ON: Press the START button until the LED is on (about 3 seconds). Ensure you are pressing the button down fully (don’t worry it can handle it).
- To begin Pairing Mode, hold down the START button until you see the blue light flash 3 times. Then, you may release. a. If the light continues to flash every second, then that means you are in
Pairing Mode.
b. If the light does not continue to flash, then you may have accidentally turned
off the remote. Please restart from Step 1 (no not USMLE, silly).
3. You should be able to see the Anki Remote on your Bluetooth list, then choose “Anki Remote” and click to connect.
4. If you right-click on “Anki Remote” and select Rename, then you can name it anything from “Yo it’s Anki Timeee” to “Grind Mode.” For this demonstration, we will name it Anki Remote though.
5. If it does not connect to your Bluetooth, please restart the remote by pressing the START button until LED is off (about 5 seconds). When the constant blue light disappears, this means the Anki Remote has been successfully turned off. Then, revisit step 1.
Seamless Connecting Forever
Just like your Airpods 🎧, your Anki Remote will auto-sync to your Mac as soon as you turn on the remote from this point forward!
2b. Setup the Karabiner-Elements Software
Once you have downloaded and opened Karabiner-Elements, then we have to allow the proper permissions. Please follow the steps outlined by Karabiner-Elements or refer to the video below. Additionally, you must approve of the Karabiner-Elements download in Security and Privacy in System Preferences since it is a download from the internet rather than the App Store. Follow the demo below!

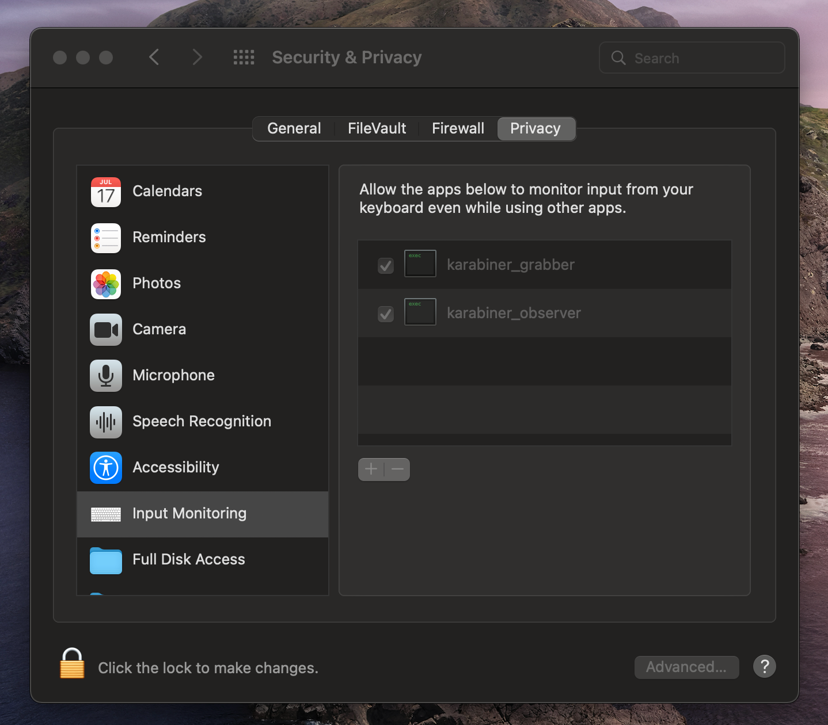
- Karabiner-Elements will also have you go to Security and Privacy → Privacy → Input Monitoring → Check the karabiner_grabber and karabiner_observer boxes. It should look like this once you are done.
- Once Karabiner-Elements has the proper permissions, please open Karabiner-Elements (NOT Karabiner-EventViewer) from your Applications.
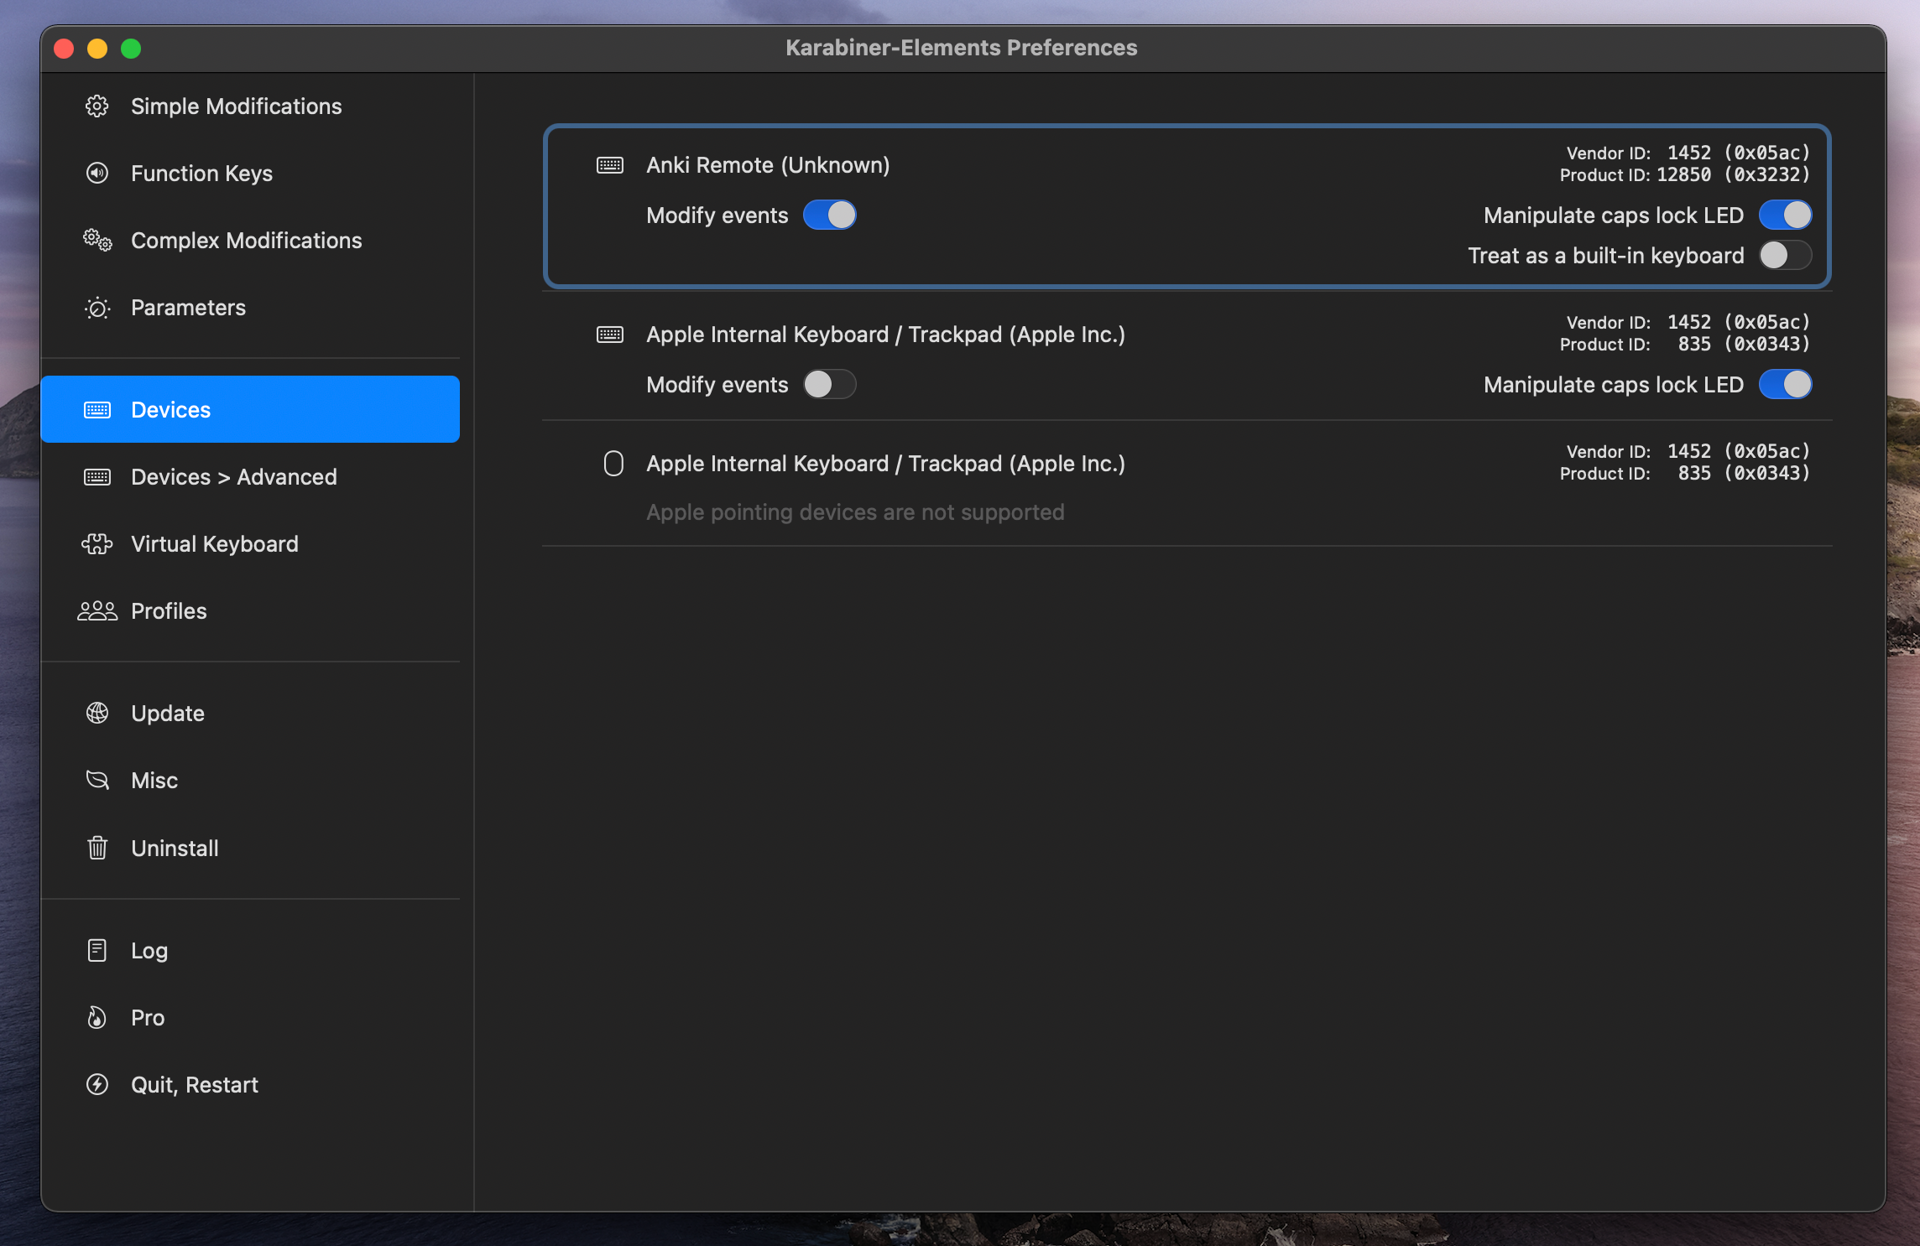
- Then, please go to the Devices tab and make sure that the Apple Keyboards are unchecked while your Anki Remote is checked. It should look like this:
3. Personalize Your Anki Remote
The video below shows the general steps. We highly recommend following along once you decide on your remote setup.
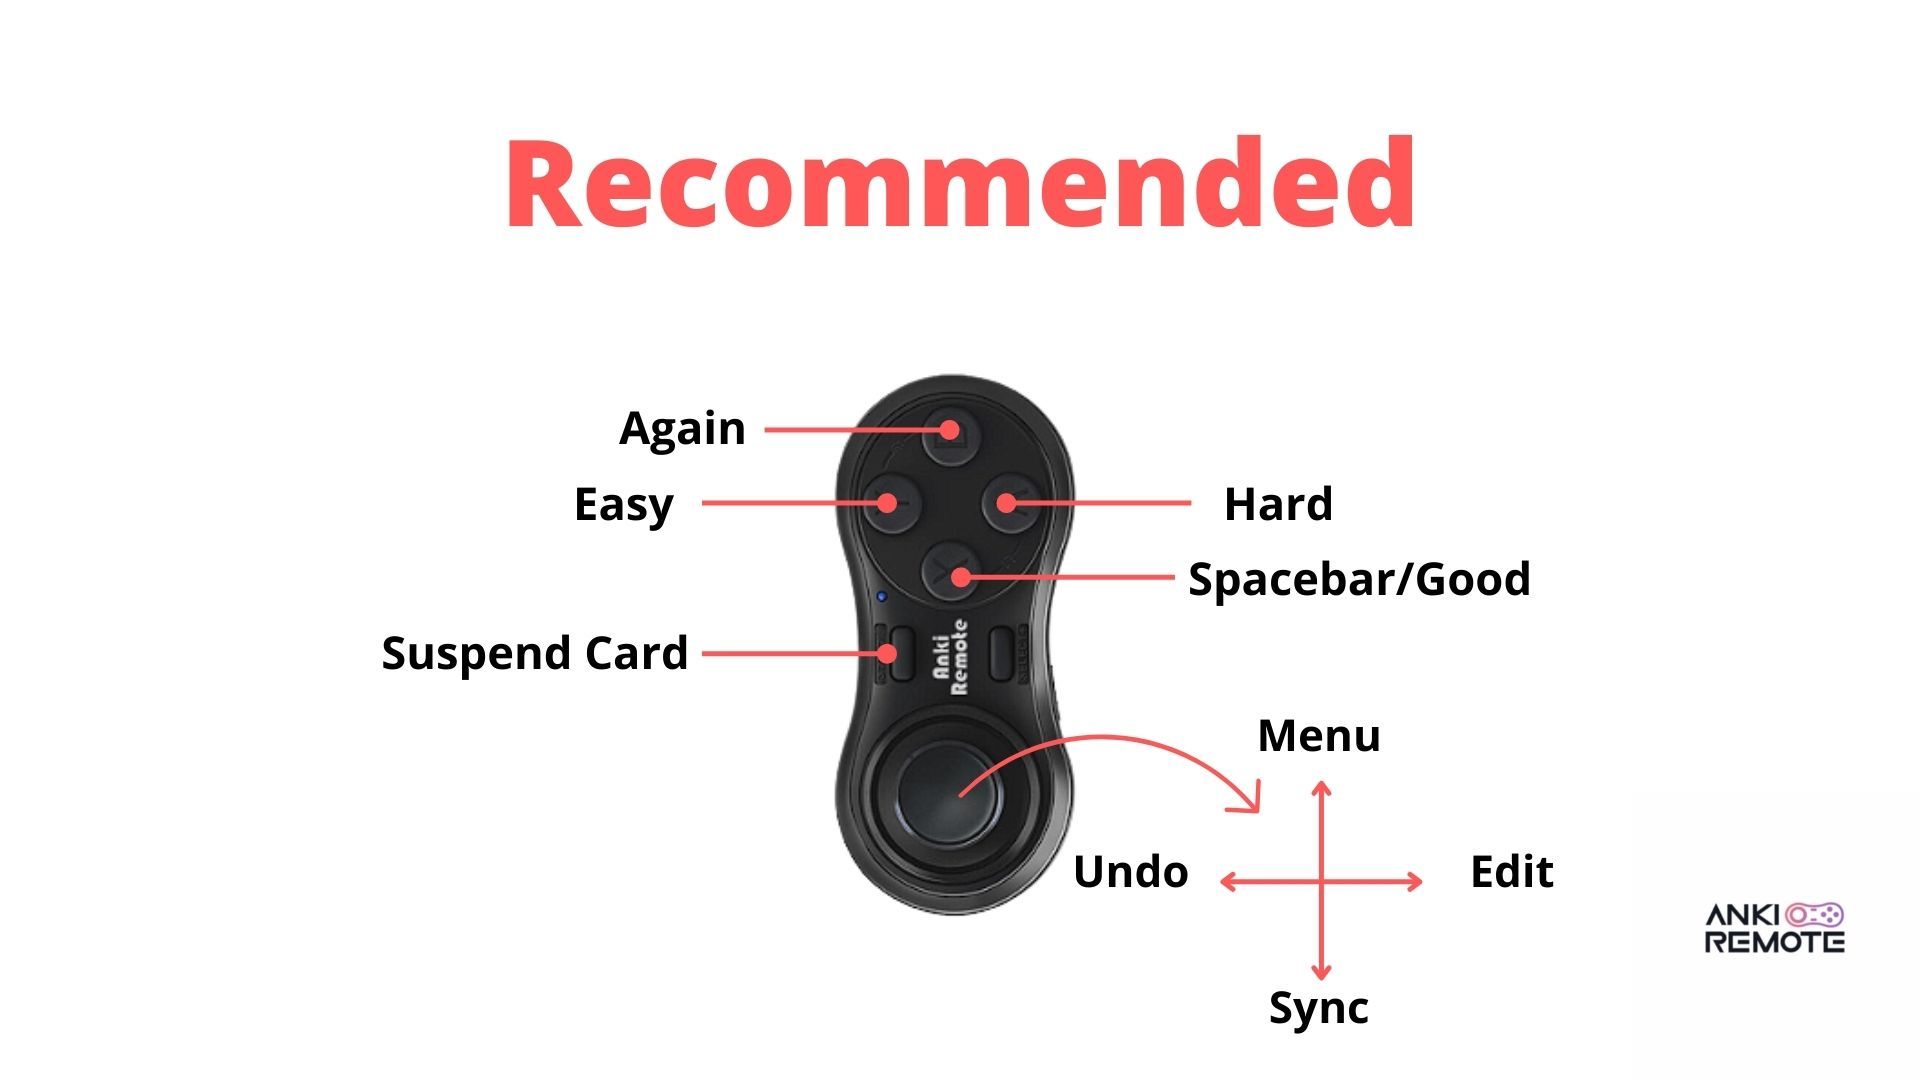
Top 3 Recommended Setups
We recommend one of three set-ups for your Anki Remote. These set-ups have been tested to maximize comfort and decrease travel time for your thumb.
🍎 The Minimalist
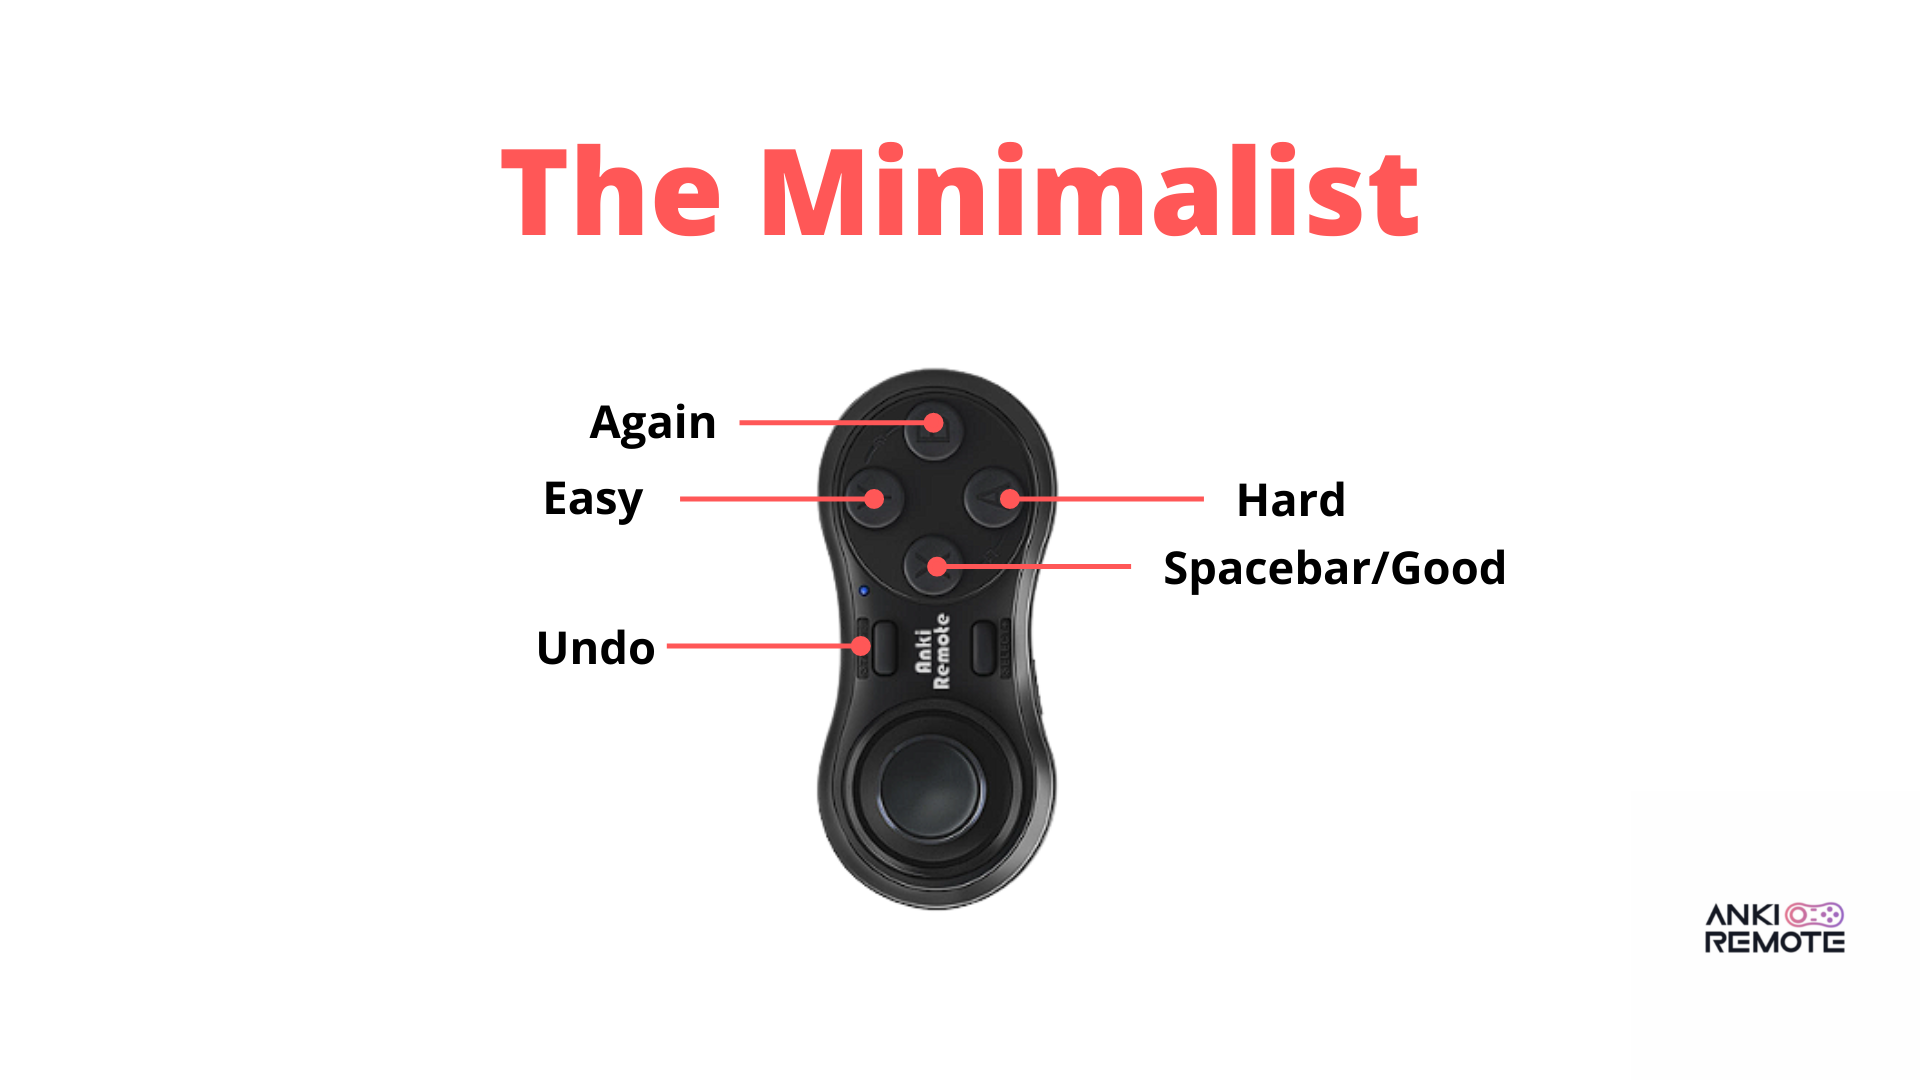
First off — this fluff-free setup option will get you up and running through cards before you know it. This setup has a few key features to point out.
As any Anki expert would know, the spacebar key can be used to choose the “Good” option (corresponding to key #3). Therefore, we decided to take #3 completely out of the equation, allowing you to focus on the highest yield thumb maneuvers.
Steps for 🍎 The Minimalist
Visual learner? No worries refer to the video on Step 3 and just download the two files in red below.
- Click here for the first file (named karabiner.json)
- Navigate to Karabiner-Elements. Find Misc (left menu bar) → Click Open config folder button.
- Drag and drop the first file you downloaded.
- Click Replace when prompted. Ensure that you only see one file with the name karabiner.json
- It will not work if the file is named anything other than “karabiner.json”
5. Click here for the second file (named complex.json)
6. From within the config folder that you opened previously, click on assets → complex_modifications. It should be empty.
7. Drag and drop the second file.
8. Go to the Complex Modifications tab and select Add rule, then Enable Suspend Card and Undo Card functionalities.
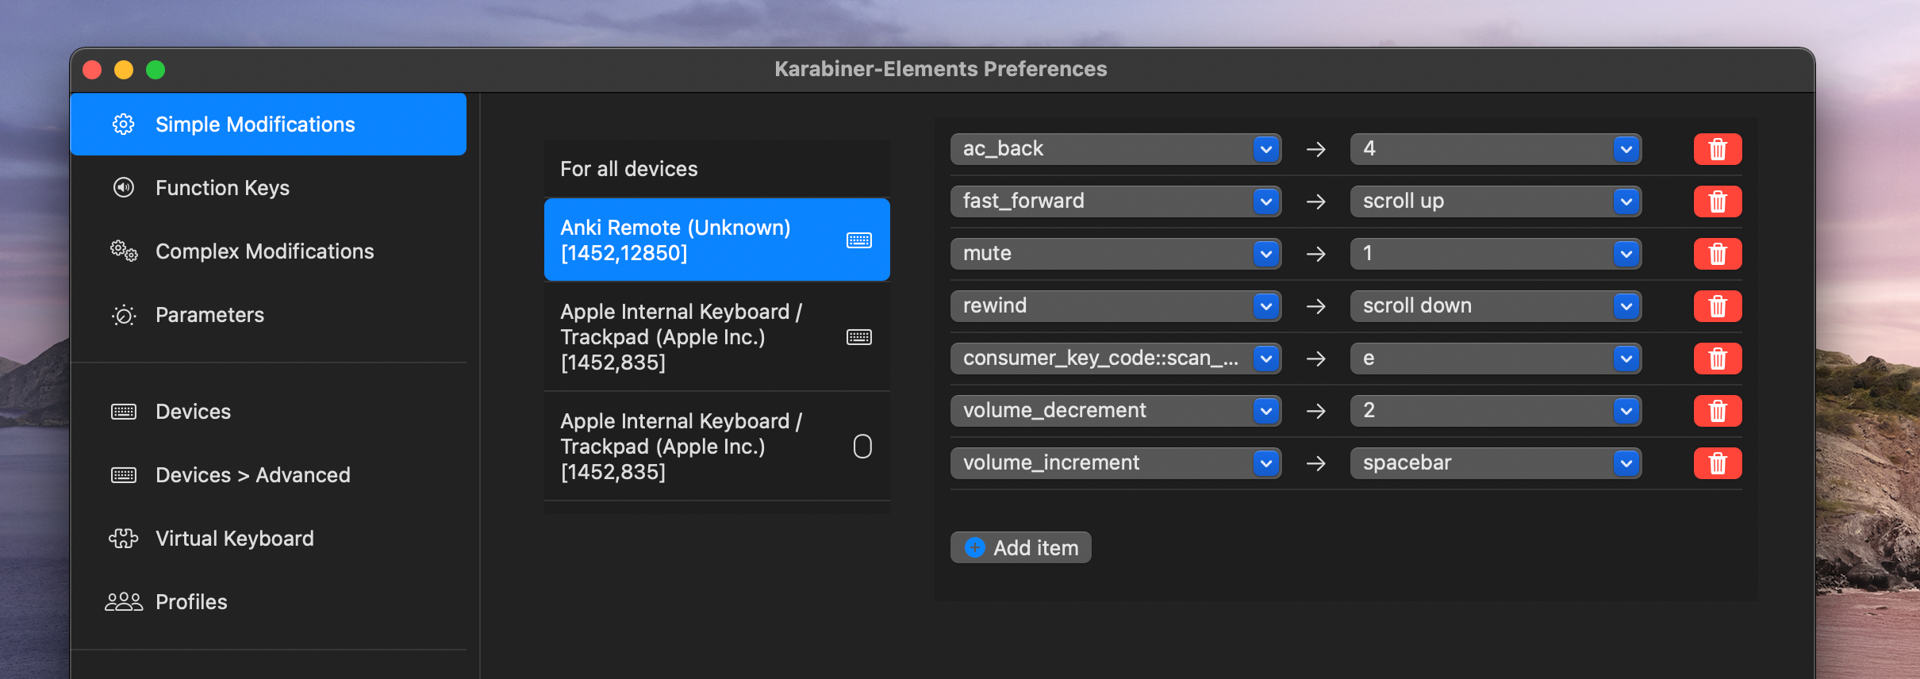
To see if it worked, go to Simple Modifications on Karabiner-Elements. Do you see this?
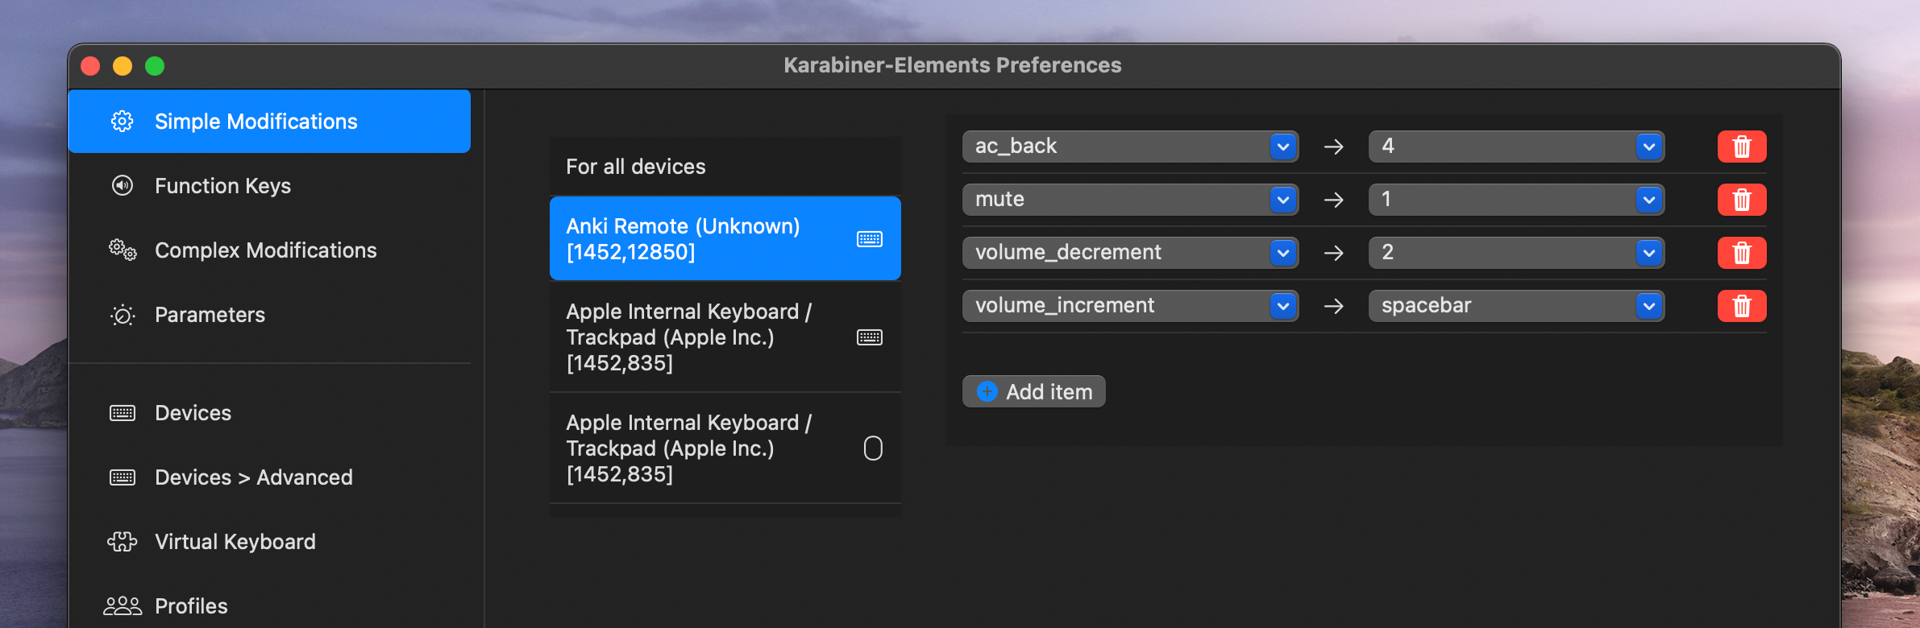
This is what the Simple Modifications should look like if everything goes smoothly.
That’s it — head over to Anki and get started!
Having trouble?
- Email us at [email protected] OR
- Just can’t wait for an email response to Anki? Just follow this video and you will be ready to go in 43 seconds.
👑 AnKing Lover
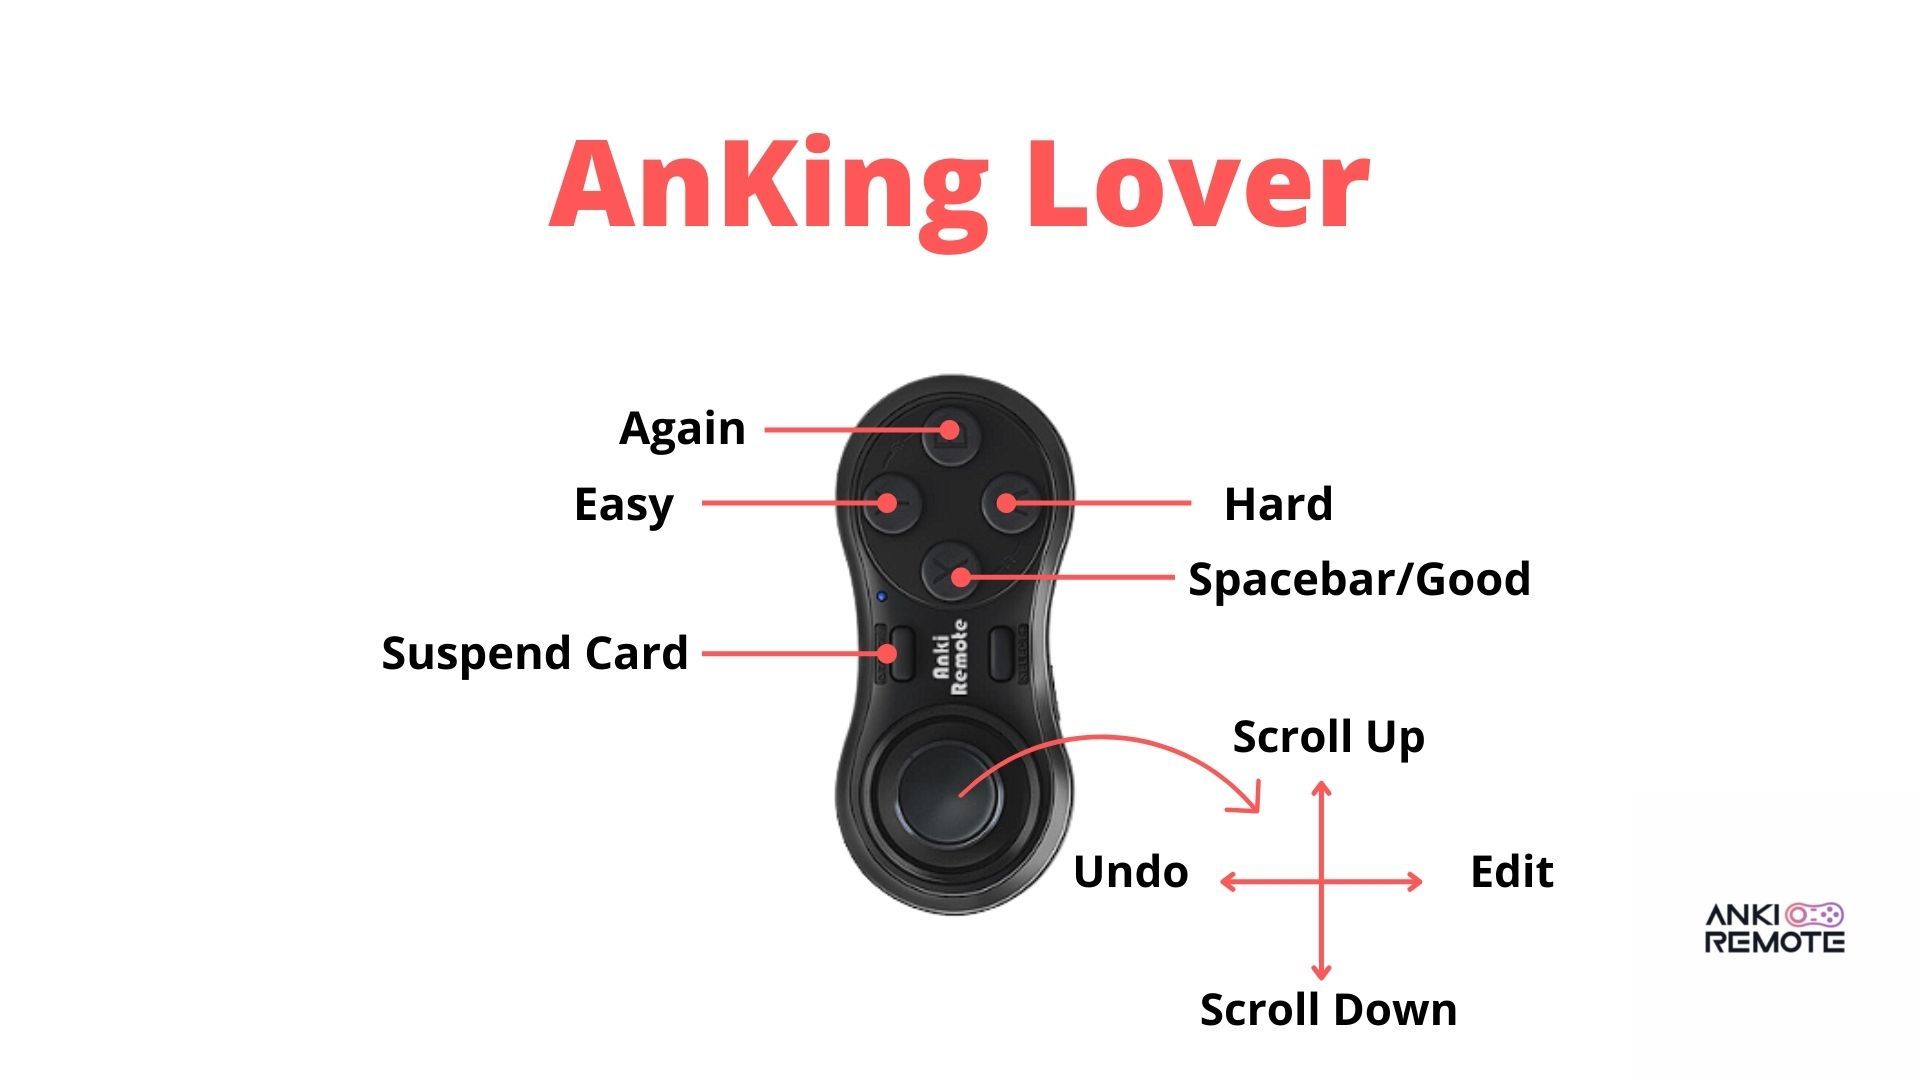
This remote setup is made for people who love AnKing and other pre-made decks with many images attached. With the pre-programmed scroll features, you can easily scroll through any references that the Anki card may contain without having to reposition your hand.
Steps for 👑 AnKing Lover
Visual learner? No worries refer to the video on Step 3 and just download the two files in red below.
- Click here for the first file (named karabiner.json)
- Navigate to Karabiner-Elements. Find Misc (left menu bar) → Click Open config folder button.
- Drag and drop the first file you downloaded.
- Click Replace when prompted. Ensure that you only see one file with the name karabiner.json
- It will not work if the file is named anything other than “karabiner.json”
5. Click here for the second file (named complex.json)
6. From within the config folder that you opened previously, click on assets → complex_modifications. It should be empty.
7. Drag and drop the second file.
8. Go to the Complex Modifications tab and select Add rule, then Enable Suspend Card and Undo Card functionalities.
To see if it worked, go to Simple Modifications on Karabiner-Elements. Do you see this?
This is what the Simple Modifications should look like if everything goes smoothly.
That’s it — head over to Anki and get started!
Having trouble?
- Email us at [email protected] OR
- Just can’t wait for an email response to Anki? Just follow this video and you will be ready to go in 96 seconds.
🥗 All You Can Eat
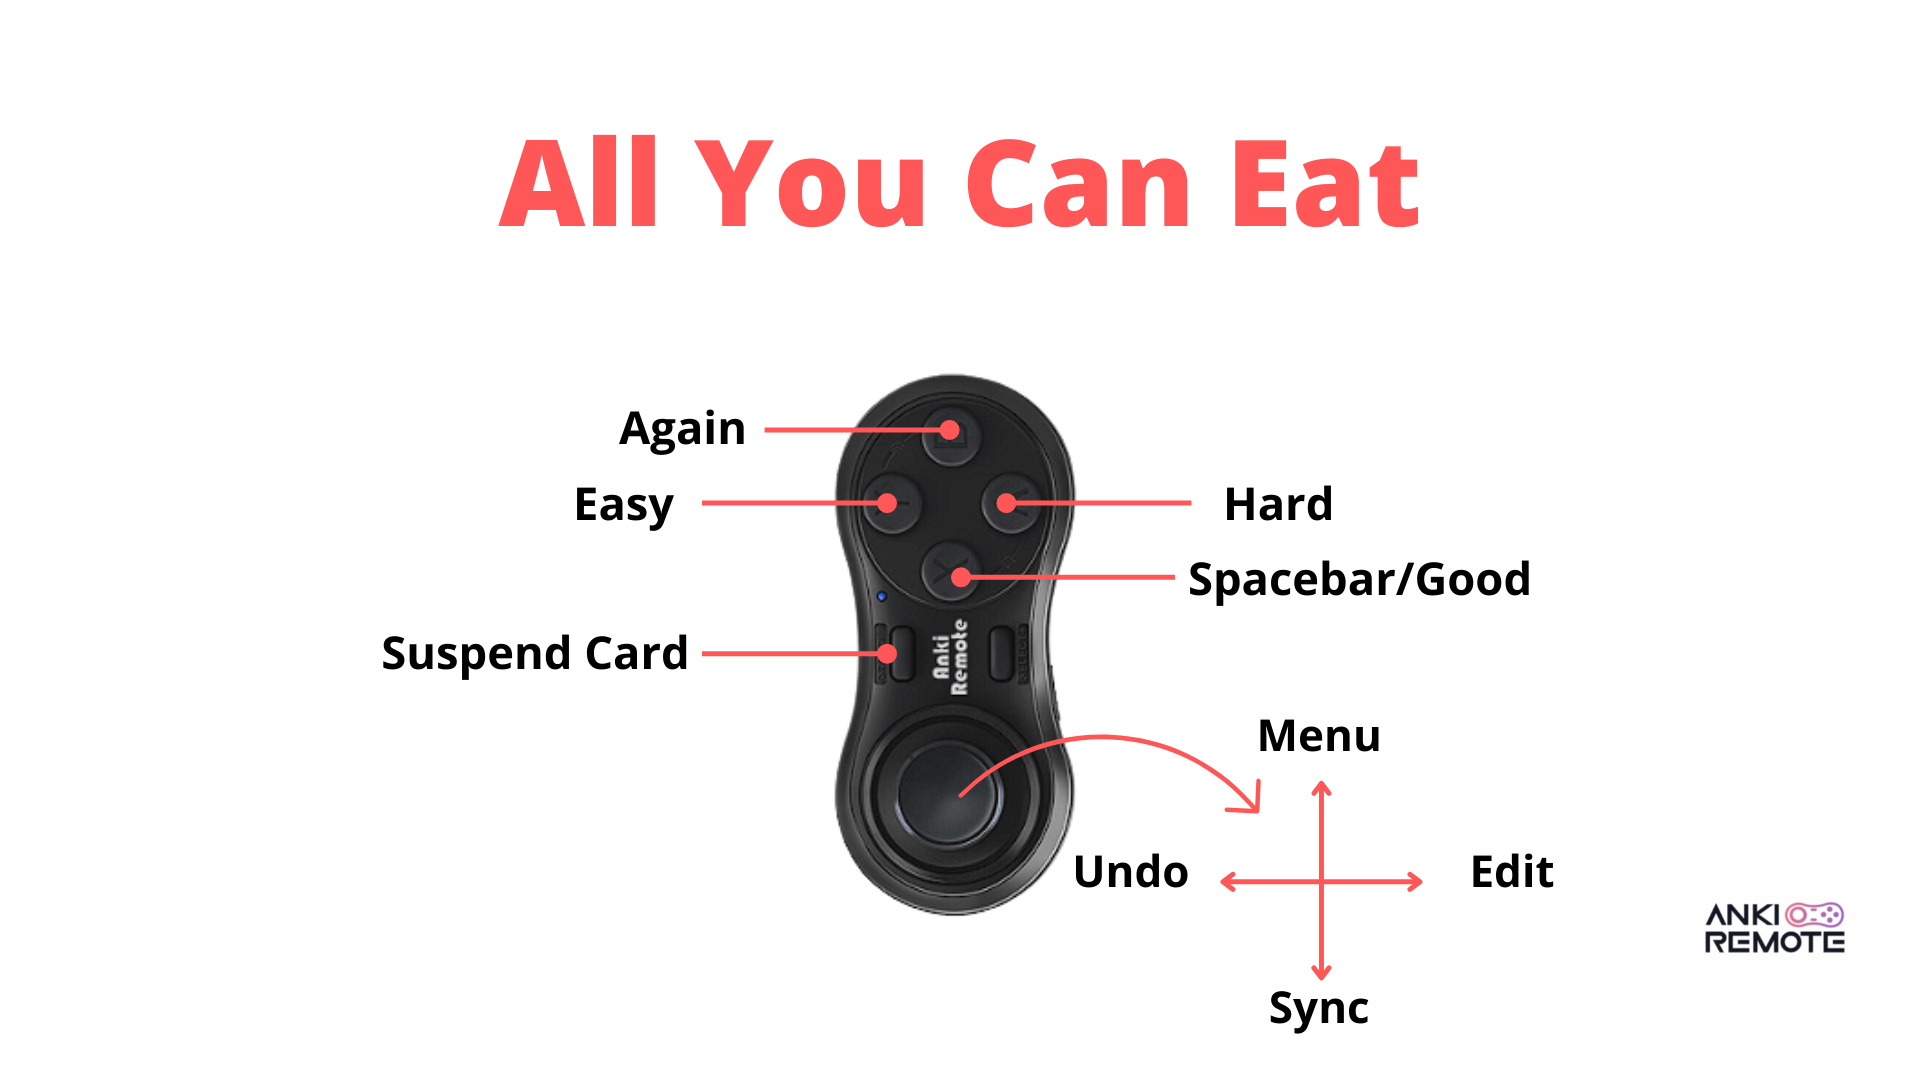
Some Anki users just can’t live without their extra keyboard shortcuts. If you’re one of these people, then the All You Can Eat setup option is for you. Let’s be real now, you’ve probably been using the AnKing Deck to study for Step 1 since your very first day of orientation.
Programming your remote with this setup option will allow for a few (optional, but very helpful) features that can shave even more time off of your daily reviews.
Steps for 🥗 All You Can Eat
Visual learner? No worries refer to the video on Step 3 and just download the two files in red below.
- Click here for the first file (named karabiner.json)
- Navigate to Karabiner-Elements. Find Misc (left menu bar) → Click Open config folder button.
- Drag and drop the first file you downloaded.
- Click Replace when prompted. Ensure that you only see one file with the name karabiner.json
- It will not work if the file is named anything other than “karabiner.json”
5. Click here for the second file (named complex.json)
6. From within the config folder that you opened previously, click on assets → complex_modifications. It should be empty.
7. Drag and drop the second file.
8. Go to the Complex Modifications tab and select Add rule, then Enable Suspend Card and Undo Card functionalities.
To see if it worked, go to Simple Modifications on Karabiner-Elements. Do you see this?
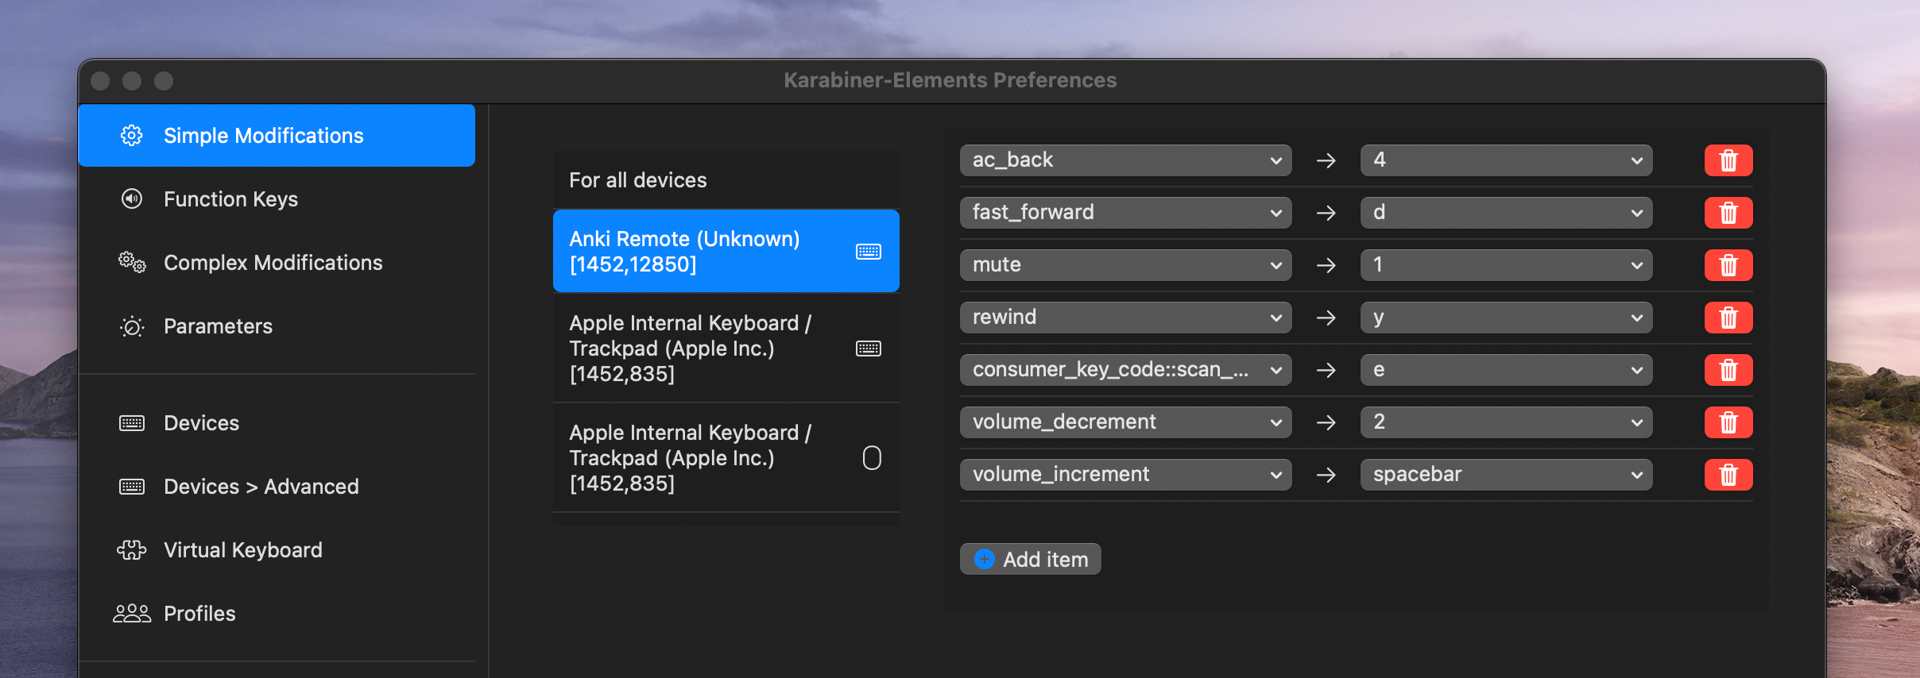
This is what the Simple Modifications should look like if everything goes smoothly.
That’s it — head over to Anki and get started!
Having trouble?
- Email us at [email protected] OR
- Just can’t wait for an email response to Anki? Just follow this video and you will be ready to go in 87 seconds.